Hello Fellow Bloggers!

Again feeding into my recent love for DIY, I took Whimseybox‘s motto,”stop pinning and start making!”  This week I made these super cute hand stamped coat hangers.  This a very easy and quick DIY project.

Image

Materials:

  • Wooden Coat Hangers
  • Small Letter Stamps
  • Permanent Ink Pad

Image

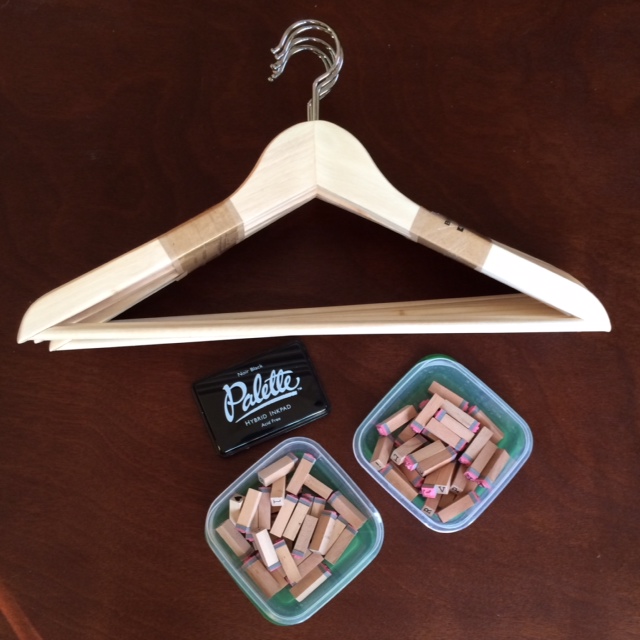
I purchased the hangers from Ikea.  They are called the Bumerang Curved Clothes Hangers and are $4 for a pack of 8.

I purchased the letter stamps, both upper and lower case sets, and the permanent ink pad from Hobby Lobby.  The ink pad MUST BE permanent ink to keep the ink from rubbing off on clothing.  These items were not super expensive and, lucky me, Hobby Lobby happen to have a sale on stamps.  If stamps are not on sale, remember you can use Hobby Lobby’s app or print a coupon for their web page to get the one most expensive item at a discounted rate.  I’m sure that these stamps will be useful in future DIY projects.  So consider it an investment!

You can opt to purchase a stamp set which you can pre-align the letters in a holster before stamping.  However, I like the appearance of the uneven spaced, individual crooked letters.  It perfects the handmade look.

Before getting started on stamping your hangers, I would advise practice stamping on a piece of paper first.  This way you can get idea of how to align the letters individually. This way the letters are not too far apart or touching.  Plus it gives you a chance to write out what you want your hangers to say.  I did my test trial in my sketchbook.  Check it out!

Image

Once you feel comfortable with stamping the letters, nothing like the present to get started!  Don’t worry if you mess up!  They are supposed to be imperfect.  The ink dries very quickly, but I gave them 24 hours before touching them to be on the safe side.

Instead of keeping these for my own coat closet, I decided to ship them off to a friends who recently bought her first house.  These are going to be a great house warming gift!

Happy New Year Fellow Bloggers!  I am only four months behind on saying that!  Sorry guys and gals, this little woman has been busy!  My goal, starting now, is to do a post once a weekend.

For those of you that follow me on Instagram (@thatgirl_leah) know that my newest craze are Do It Yourself craft kits.  I have always been a fan of DIY.  Within in the past month, I have seen advertisements on Facebook for a product called Darby Smart.  Out of curiosity, I googled it (like I do everything).

“Darby Smart is a do-it-yourself crafting startup working with top Pinterest designers of DIY accessories, fashion and home items to Kit, market and sell their projects to consumers, complete with all materials and instructions needed to complete the project.”

In other words, it is a do-it-yourself craft project in a box!  You can opt to buy craft supplies individually, do-it-yourself projects (which include all the materials and instructions) or sign up for their monthly subscription (which is a new DIY project sent to you each month).  This truly intrigued me!  It does not cost any money to sign up and you are given a $10 off your first purchase when you become a member.

FREE MONEY!  Of course, I decided to purchase one of the DIY projects!  They have numerous projects at different price ranges.  Check them out!

I purchased the Lace Earrings Kit.  It came in a super cute teal box with chevron on the sides.  (Did I mention I’m crazy about chevron?!)

darby2I’m not sure that “Internet Rehab Inside,” is the best phrase for this box, especially since I have become quite the avid internet shopper.

Here are the supplies which were provided to make the earrings.

darby1The instructions were located on the back of the card.  They were basic and I was able to use my own creativity to create my earrings.  The kit made three sets of earrings.  Here is the finished product!

darby3I have to say that every time I wear a pair of these earrings, I always get a lot of compliments.

Darby Smart provides more than enough for you push your creativity.  I had a lot of beads remaining, so I went to the craft store and picked up more supplies to make more of these earrings.  Stay tuned for a follow up!

Good Evening Fellow Bloggers,

It’s been a while, too long!  Summer has taken me away from behind the computer, but fall is right around the corner.  This summer flew by!  Can someone please press pause and preserve these last final summer days?  This summer has been an unusual one for Charlotte, NC with lots of rain.  On the rainy days, I have reconnected with my creativity and designer mind.  This is what I have created.

These are a gift for my best friend from college that now lives in Arizona.

Before

henna_inspired_shoes_before

After

henna_inspired_shoes_after_02

henna_inspired_shoes_after_01I purchased the shoes from Khol’s.  The shoes are designed much like TOMS.  They are a basic red canvas shoe.  Khol’s also sells these shoes in black, gray and gold.  My best friend requested red shoes.  (Life is better in bold colors.)  I used gold Tulip Metallic Fabric paint, that I purchased at Hobby Lobby, to apply the design to the shoes.

My most recent fascination has been with henna designs.  I love the delicate and detailed patterns.  I studied many henna YouTube videos and sketched numerous henna designs in my sketchbook.  I was amazed at the peacock design and focused on this for the shoes.

After much studies, I was ready to apply the design to the shoes!  I used an acrylic pencil to lightly draw the design on each shoe.  With a steady hand, I used the squeeze bottle of fabric paint to bold the design on each shoe.  And ta-da!  I have created some custom henna inspired shoes.

I have posted these pictures on my Instagram and Facebook page and have received a lot of positive feedback from family, friends and colleagues.  Everyone has encouraged me to create more of these shoes and sell them on Etsy.  I am currently doing some more research into this possibility.  Who knows!  Never say never!  You may see my work for sale soon on Etsy!  Stay tuned!

In a hurry to complete this project and have my best friend debut my henna inspired shoes in Arizona, this was my quick signature mark for my first project.

Be on the look out for a new logo design!

henna_inspired_shoes_after_03Side Note: This is a mile marker for me as a designer!  This is my first wearable design and I am excited to have my best friend debut it.  Thank you, Monica!  You have always encouraged and supported me in all my crazy designs and thoughts!  You are the best!

I recently had lunch at the Big View Diner and saw an order of Shrimp & Grits.  I have been craving it ever since that lunch date!  I headed over to my favorite place to pick up recipes, aka Pinterest.  My goal was to find a savory, but easy recipe for Shrimp & Grits.  After much searching and review of other recipes, I found this one.  I have never made Shrimp & Grits, but this recipe was very easy and delicious.  A great recipe to satisfy my southern dish craving.

Image

Shrimp & Grits

Ingredients:

(for shrimp)

  • 5 slices hickory smoked bacon, sliced
  • 1 onion, sliced
  • 1 clove garlic, minced
  • 1 lb. peeled & deveined FRESH shrimp
  • salt & pepper, to taste

(for grits)

  • 5 cups chicken broth
  • 1 1/2 cups grits (not quick cooking!)
  • 2 tablespoons butter
  • 1 1/2 cups grated medium cheddar cheese
  • 1/4 cup grated real Parmesan cheese
  • salt & pepper, to taste

Directions:

  1. Start by cooking grits.  Bring chicken broth to rolling boil in large pot.  Whisk in grits, salt and pepper, cover and reduce heat to medium (medium-low) and cook 15 minutes, stirring occasionally.
  2. While the grits are cooking, preheat a large skillet over medium heat.  Saute bacon and onions together until bacon starts to crisp and onions have browned, 5 minutes.  Stir in garlic, shrimp, salt and pepper.  Stir another 3 minutes until shrimp are bright pink and thoroughly cooked.  Remove from heat.
  3. Finish grits by melting in butter and cheeses.  Taste and adjust seasonings.
  4. Spoon grits into bowl and top with shrimp mixture.  Top with parsley.  Serve immediately.


This month at the Ladies Do-It-Herself class at Home Depot, three of the Adirondack chairs which we built were raffled off.  Guess what?!  I won!

Here is a picture of my Adirondack Chair!  I did not purchase the teal seat cushion which is pictured, but I was allowed to select a pillow to go with the chair.  Later I found a nice seat cushion for the chair at another store.  Unfortunately, with the high humidity and all the rain we have been receiving, I have not had a chance to stain and treat the chair.  For now it resides in my garage.  I want to ensure that this chair lasts!

adirondack_chair

Cook out season is here!  In the south, pickles are a MUST HAVE at a cook out.  I love pickles!  This summer I am attempting to make my own.  (How hard could it be right?!)  I researched some recipes online and found this super easy recipe from The Brothers Green on YouTube.  (P.S. They are one of my favorite shows to watch on The Official Hungry Channel.  They now have their own YouTube channel called Brothers Green Eats, be sure to check them out!)

Below is the YouTube video and recipe.

Sweet & Spicy Refrigerator Dill Pickles

Ingredients:

  • 3-4 Cucumbers
  • 1/2 Cup Dill
  • 3-5 Garlic Cloves
  • 1-2 Jalapenos
  • 1 Quart Mason Jar
  • 2-3 Tablespoons Salt
  • 2-3 Tablespoons Sugar
  • 1 Cup Vinegar

Directions:

  1. Clean and cut cucumbers length wise in to quaters.  (This is hot dog length to make spears, for all those that get length and width confused.  Yes, I admit, I am one of them!)
  2. Pack quarter cucumber spears into the 1 quarter Mason Jar.
  3. Smash garlic cloves and remove garlic peel.  Pack garlic cloves into Mason Jar with cucumbers.
  4. Dice jalapenos and add them to the Mason Jar.  You can have the option to add the seeds and white membrane to Mason jar. (Note: I added 1 whole jalapeno with all parts.  The pickles turned out quite spicy.)
  5. Rough chop the dill and smash the dill on top of all the ingredients in the Mason Jar.
  6. To make pickling brine, add 1 cup of vinegar, 1 cup of water, salt and sugar to a pot on medium high heat.  (I used 1 to 1 ratio of salt to sugar.)
  7. Bring to a boil.
  8. Once ingredients are combined in the brine, pour in mason jar over all ingredients.
  9. Cap and place the pickles in the refrigerator for a few hours to marinate.

Enjoy!

Hello Ladies!  The third Thursday of the month has almost arrived, which means another Do-It-Herself Class at The Home Depot.  This coming Thursday, June 20, 2013  The Home Depot will be hosting a Ladies Do-It-Herself Class on How to Build an Adirondack Chair.

Want a sneak peak?  Here is the YouTube video of how to complete the project on your own.  (But hands on is more fun!  Ana White definitely makes this job appear easier than it truly is.  No offense, Ana.)


The class will be held at all Home Depots on Thursday, June 20, 2013.  If interested in attending, stop by your nearest Home Depot and inquire.  Some Home Depot stores request that you RSVP so that they can plan snacks and seating accordingly.

The Rivergate Home Depot (Charlotte, NC) will be serving heavy hors d’oeuvres from City Tavern, assembling and decorating 4 Adirondack chairs which will be raffled off at the end of the night.  AND!  If you bring a friend, you will receive an extra raffle ticket to double your chances for winning.  An Adirondack chair will look lovely on my small front porch.  Wish me luck!

Pictures to come!  Again, I will scan in the Home Depot Do-It-Herself booklet again for those of you that are unable to attend, but like the instructions.

It was a busy week!  With warmer weather and bathing suit season here, I am returning to my healthier lifestyle, not that it should have left to begin with.  This means setting boundaries of work and personal life, healthier meals, running and more yoga.  I have joined the YMCA hosted “Couch to 5K” to aid in getting my running stride back.  I am registered to do the Electric Run in July, here in Charlotte, NC.  I also am doing two HOT yoga classes a week.  It felt great to return to my yoga practice this week.

Homemade pretzels are not on “the healthier eating habits” list, but I have been craving them.  I did well this week, therefore I justified making this recipe.  One cheat treat, a week.  (I’m a poet and I didn’t even know it.)  Move over Betty Crocker because I’m in the kitchen now!

homemade_pretzels

Homemade Pretzels

Makes 20

Ingredients:

  • 2 1/4 teaspoons (1 package) active dry yeast
  • 1 1/3 cups warm water
  • 1/3 cup light brown sugar
  • 4 1/2 cups plain flour
  • 1 tablespoon baking soda
  • gourmet sea salt

Directions:

  1. Dissolve yeast in 1 1/3 cups of warm water.
  2. Add sugar and flour and mix until you have a smooth and elastic dough.  If you have difficulties combining all the flour once the dough ball begins to form add a little extra water to the mix, but no more than 1/3 of a cup extra.
  3. Cover with plastic and let it rise in a warm location for 45 minutes.
    (Note: If you are like me and tend to keep a cooler home, if it is warm outside place your covered dough on the patio table or in the garage.)
  4. Bring a large pot of water to a boil.  Add baking soda, and stir until the soda is dissolved.  And Preheat the oven to 475 degrees Fahrenheit.
  5. Cut the dough into 20 pieces and roll each piece into a long sausage.  Twist the two ends around each other three times, put ends together and thread through the loop which was created when the 2 ends were twisted.  It will form a tight pretzel looking shape.  Try different rolling/twisting techniques.
  6. Place each pretzel in the boiling water baking soda mixture and let them cook for 10 seconds on each side.  Take them out and place them on parchment paper-lined baking sheets.
  7. Sprinkle with salt.
  8. Bake at 475 degrees Fahrenheit for 8 to 10 minutes or until dark golden.
  9. Cool on a wire rack.

Enjoy with spicy or sweet mustard, melted cheese or cinnamon and sugar.  Get creative with toppings!

Good Evening!  I know, I know … I am slacking!  But working over 40 hours a week, maintaining a home (which I will report, being a homeowner is nice, but a lot of work), taking care of 2 mini wiener dogs, spending time with family and friends, all while attempting to live life to its fullest has had me away from my computer.  BUT!  Tonight that changes, with my trusty smarty pants dog by my side, my laptop in bed with me and my creative brain ready to share.  Ready … set …

lola_and_i_bloggingFor those of you that have been patiently awaiting for me to share The Home Depot Do-It-Herself Booklet for May, Inspired by Pinterest: Succulent Gardens, here it is!

I’m sorry it took so long!  I decided to climb through the mess of my office tonight to reach my scanner and scan the 7 page booklet.

I admit!  I was sad that the succulent plant I assembled at the Home Depot Do-It-Herself class was not raffled off.  BUT!  I was inspired to create my own!  Here it is!

my_succulent_plantAmazingly, the weekend after I attended the Do-It-Herself Class, I found tons of succulent plants at the plant shed at the NC Farmer’s Market.

The succulent I purchased was about $4.  It is a fairly decent size and definitely a lot more bang of my buck.  I priced this same succulent at Walmart.  Walmart had their succulent plants priced between $5 and $10.  The plants were not as healthy and large as the ones I found at the farmer’s market.

I purchased the large glass container from Hobby Lobby for $8, plus I had a 40% coupon, which reduced it to approximately $5.  I also purchased 2 containers of uncolored sand at Hobby Lobby, approximately cost $2.50 each.  The rocks and soil, I purchased from Walmart, which ranged to a total of $6.

You do not have to purchase rocks and sand for this project.  I added the rocks and sand to make it more decorative.  You can use any sort of container for succulent plants.  The booklet, which I provided, has plenty of container suggestions.

Total project cost: approximately $20

If you create a succulent garden, please share pictures of your garden.  I look forward to seeing your creative ideas!

For LIVE up-to-date inspirations, please feel free to follow my instgram!  (@thatgirl_leah)